
Sep '11 - Jan '13
My sister-in-law was staying in a hotel and was taking advantage of the hotel’s gym to get some exercise. While she was running on the treadmill a little boy came in and began playing on the various pieces of equipment. Of course, there were signs up everywhere saying that children needed to be accompanied by and supervised by a parent when in the gym, but this little boy’s parents were nowhere to be seen. My sister-in-law can be pretty easy-going when she wants to be and decided to ignore the annoying child and continue running. All was well until the little boy came up to her and asked her to get off the treadmill because he wanted to play on it. This was not ok. I forget exactly what she told the boy but I’m sure he’s still having nightmares about it now. The moral of this story … don’t let your child run around misbehaving, because if you don’t parent your child then someone else will. The same is true with paragraph styles in InDesign.
Ok, it may not be true that someone else will “parent” your paragraph styles if you don’t, but setting up parent-child relationships with your styles can be helpful. For the record, you won’t see the words “Parent” or “Child” in any of the InDesign options (but they do come up in some of the help files). When I talk about parent-child relationships I’m talking about the general options “Based On” and “Next Style” when creating and editing paragraph styles. “Based On” lets you select a style that the one you are creating, or editing, is a child of. “Next Style” is a hierarchical form of a parent-child relationship where you select a style that is automatically applied after the first style. I’ll go over each of these.
Let's say my basic document has text that has a title, subtitle, and body text. I can set up paragraph styles for each of these elements (title, subtitle, body) and let each one have a distinguishing style. My title will be a larger font size. My subtitle will be smaller in the same font family as the title, and the body text will be a different font and a different size from both.
I start by creating the “Title” paragraph style as an 18pt Helvetica Bold font. The “Subtitle” style will be based on the “Title” paragraph style and I’ll just change the size to 14pt. Notice that when reading the description of the style it shows you the parent style (in this case “Title”) and then the distinguishing changes to that style.

Finally, I’ll create the “Body” paragraph style leaving it based on the default style or “[Basic Paragraph]” style and just change the font size to 10pt. Now I can select and apply the different styles to the text in my text box.
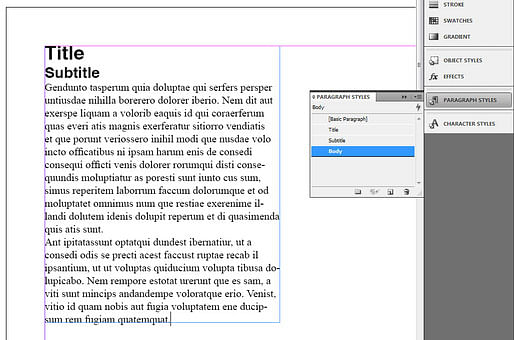
It looks ok, but maybe I’m not a big fan of how bold the title and subtitle look. Since my “Subtitle” style is based on the “Title” style, I can simply edit the parent style and any changes I make to it will be reflected in the child style. So if I change the “Title” style to be regular rather than bold, the subtitle will also be regular and I don’t have to change it. The same would hold true if I wanted to change the font or anything else. If there is anything I don’t like about the child style but I want to keep it on the parent style I can just edit the child style and it will show that as a distinguishing change from the parent style.

Changing focuses slightly, let’s look at the “Next Style” option. This may be confusing to call it a parent-child relationship as well because we just went over a different type of parent-child relationship, but regardless of the styles and what they are based on, the “Next Style” option deals with the text hierarchy. This is useful when you have elements of text that will always come after one another. For example, my subtitles will always follow my titles, and body text will always follow a subtitle. In other words, the title’s child is the subtitle, and the subtitle’s child is the body text.
To use this feature, set up the paragraph styles with their corresponding “Next Styles” and then type your title in the text box with the paragraph style set to “Title.” When you hit enter to start the next line InDesign will automatically select the child style, in this case “Subtitle,” for you. When you are finished typing your subtitle hit enter and InDesign selects the next child style for you, “Body.”
While my example looks fairly basic, you can do a lot with modifying your paragraph styles to get the text to look just the way you want it. However, don’t get too locked into always working with the paragraph styles options dialog. Sometimes there are instances when you just need to change one thing and it’s easier to do it on an individual basis and override the paragraph style (when you do this you'll notice a little plus sign '+' next to the paragraph style).
For example, in my portfolio I have a paragraph style for image caption text, but depending on the placement on the page I want some captions to be left justified and some to be right justified. So my caption paragraph style is set to left justify, but where I need it to be right justified I just select the text and change it at the top of the screen. I suppose I could make two separate styles “caption left” and “caption right,” base one on the other and take care of it that way but I find it easier to handle it on a case-by-case basis.


Commentary on looking for work, portfolio and resume design, networking, social media and the job search, interviews, dealing with rejection and the joy of landing a job.
No Comments
Block this user
Are you sure you want to block this user and hide all related comments throughout the site?
Archinect
This is your first comment on Archinect. Your comment will be visible once approved.