I love the construction detail threads, so I'm starting one.
I have a client with an existing stair, built circa 1930. The stair has birch treads and painted risers (and wrought iron rail).
The owner has fallen in love with these beautiful hand painted Moroccan tiles. They want to incorporate them into the stair risers, either as a full riser, which would be expensive in material costs, or as an inset framed by painted wood to create the riser, which is expensive in labor.
Concern #1: we'll end up tearing apart the entire stair to do this. Tile mounted on greenboard mounted on a structural backplate is going to be almost 2" thick, and I'm sure the existing riser is only 3/4".
Concern #2: the riser is a high-abuse location (they get kicked) and the tile will be prone to disengage.
Concern #3: I can spend all day today drawing it, only to have it come in so far over budget it will be canned.
Other concerns?
Or should I just tell them it's not a great idea and find another place to incorporate the beautiful tile?
Or should I just tell them it's not a great idea and find another place to incorporate the beautiful tile?
sounds like you've answered you're own question. Its really up to the client as to wether or not they want to pay for it and put up with the hassle though. So voice your concerns and if they still want to do it then that's their decision.
I've seen slate tile applied directly to the risers with subfloor adhesive, no greenboard, no grout. They've been in place problem-free for I think 4 years now, some friends of mine rent the house and they tend to throw high-abuse parties.....
i don't think you need greenboard; it's not a wet area. i'd probably use plywood, backer board and tile. yeah, you're going to have to rip out and replace all the treads, but you can retain the existing stringers. if it's what the client wants and is will to pay for the work, why not draw it up and go for it?
He thinks it's going to be a pain in the ass to install! But thinks the dry-mounting method may work, mounting with adhesive on backer (not green) board. The existing tread-riser joint has a painted dove trim that we could remove so they'd lose a little tread depth but still have some overhang ( a smidge).
you are not replacing the treads? how deep is the stair nosing, the riser mat'l (3/4"-1"?) and the thickness of your tile? my first solution would be to just lay the tile right over the risers.
is there access underneath the stair to cut the riser material out with a sawzall, mount new riser material behind where the existing riser material meets the stringer, and then fill in where the riser material was with whatever your backer was and let the tile fill in under the nosing? it's going to end up wacked out whatever you do, but as long as you have riser material somewhere under the tread to pick up the bending that occurs when you step on it, your tile should remain in place just fine (i'd be more concerned about the tiles popping out from tread warpage than kicking) that said your riser material will not be sitting on the stringer, but this should be easily accomodated for. it's going to be expensive whether or not you rip out the stair.
the builder will want to rip everything out down to the stringers (which i think can remain), which is probably the preferred method as noted above. i wouldn't spend any time drawing it; the only think the builder really needs to know is the tread and riser depth, which you already have. can't you just give your builder a sketch and have him throw you a price?
actually you could do that, but it would be a major pain because the edge of the router would block the travel of the bit when it hits the nosing and the floor, and you'd have to jig it up.
Contractor says no to laying tile right on the exg. risers, as it won't bond properly with wood ( I should say this contractor is also a good friend and I trust his opinion completely). But he thinks we can attach backer board to the exg. wood and then tile on top of that.
The space under the first run of stairs is accessible, so we could work from behind if need be. The last four risers, (after the landing) unfortunately, are behind a lovely original curved plaster soffit. I don't want to tear that out.
Tread warpage is a good point. These stairs are old, but are in good shape. I wonder what we'll find if we open them up?
And yeah - my drawing is pretty much a sketch elevation, no details - and the contractor will throw a price at it. He's pretty good at it.
huh. i wonder if he can rip out the treads/risers from above without screwing up the soffit uneath. it is probably lathe and plaster and prone to crack with too much banging on the stairs above. if you use the old treads/risers, you probably won't have to worry about warping much; they have settled.
holy shit, that looks way more difficult than i imagined it. i didn't realize one side of the stair was open. how are you going to detail that edge?
after seeing the stair, i actually like holz.box's idea of cutting a hole for the tile out of the existing riser, then putting backer board behind it and in-setting the tile.
if the trim is concealing both backer board and tile it's going to get pretty chunky, and how does it work with the existing trim under the tread?
the reason why i like holz's idea is that you're using the riser as the "trim"; it's not a tacked on piece that has to work with the rest of the existing stair.
okay, but if you aren't going to route the hole, than you need to have a something to attach the tile to when you cut the riser area away. since you can't use a router, it will be tough to get a clean cut with a saw
it's a good point and would take a lot of care, but once the hole is cut, you attach backer board behind the riser (from underneath the stair) to have a surface to adhere the tile.
if it's impossible to get a clean cut you may need to have a trim piece around the opening after the tile is layed, but this seems much easier and cleaner than having to trim the edge of the open stair.
totally agree with that. it means you're not going to put the tile in each and every riser (i.e. avoid the risers in front of the plaster soffit). maybe only include it in a few risers. i don't know exactly what the tiles depict, but i think there may be some design in the arrangement of them ascending the stair.
One concern with working from the back of the stair is that I imagine there is a center stringer, so we're talking about cutting pieces of backer to fit = 2x the labor.
Is that a stupid assumption? It seems like lots of older houses have a center piece under the stairs treads.
that stair is so much nicer (by light years) than anything i have seen in japan that isn't owned by a corporation...it seems a shame to touch it at all.
are you going to redo the outside face (parallel to the stringer)? i imagine the detailing there is going to be kind of difficult if you glue onto backer board and bring the face of the riser outwards. cutting into the face and inlaying the tiles is maybe the nicest looking in spite of the problems listed above.
tile is very common here and we use it a lot. for dry applications like this there are definitely adhesives that can do the job. and it will look beautiful...if the detailing can be worked out on the sides.
and if they set up the ice cream maker on their front porch on a hot day, they can sell ice cream all day long to help pay for the inset-tile stair you'll be drawing for them.
Yes, jump, it is a lovely existing stair. The cheek wall (that's what I call the wall parallel to the stringer) isn't being redone, but I think we could incorporate an edge piece that would be painted to match the finish stringer.
Sadly the existing flooring in the stair hall will also all be replaced, even though I like what is there very much. It's Minton tile, or similar, and is in great shape, but it's brown and rust which they aren't crazy about. Maybe if the tile risers come in too expensive I can swing the flooring out of the job to save money elsewhere!
I learned most of my technical terms as intern in japanese and in english have to rely on building experience as a youth; and that memory is spotty. it is funny when i do dwgs in english i have to look up terms in japanese in my trusty bilingual construction terminology book, and translate them (something unsettling about the need to translate from my 2nd language into my 1st)...
if you do it i am quite curious to see how it will come out. how the edge piece matches the trim under each tread would be interesting. hmm. i suppose if you wanted to be mildly ironic you could make the edge piece out of the same molded trim.
Did anyone else get Puddles' joke? Very funny, and very keen abstract sense.
LB..How are the tiles spaced and would they fill the entire riser? If they are smaller, perhaps they can be traced onto and mortised into the riser board by a craftsman with a sharp chisel and alot of patience. I like the idea of smushing them into the mortise with structural silicone, as it would flex with the stair and hold forever. They would withstand being kicked, too....are these 4"tiles?
Hmmm, interesting to think beyond the limitations of power tools, Nectar!
puddles has been dropping the Little Caesar guy all over the forum today, I'm not sure I get the joke specific to my stair question. He is a funny little guy, though!
i don't think power tools would work anyway. would it?
the carpenters here all do work with hand tools as necessary and don't seem to mind. mind you a typical carpenter in japan is quite ready to make complicated mortice and tenon joints by hand...maybe not the same in the USA?
i can tell that i've been in commercial construction too long now because my first instinct is too forget all the fine detail-y craftsman-y suggestions and have the whole thing removed back to the stringers and make it exactly what you think it needs to be.
most contractors would appreciate that more anyway because it's likely to take them less time if they can start from scratch/rough framing and involve less risk of messing up something adjacent that is 1) intended to stay so they're not getting paid for it and 2) likely to be damaged and replaced by them anyway.
but steven, it seems like such a waste to rip out that beautiful stair. i won't underestimate lb's contractor, but i'm having a hard time believing the new stair will have the same level of craft as the existing (did you notice how the nose of the tread is rolled down? very subtle). i also believe to achieve a high level of craft on the new stair it will have to undergo some thorough detailing; you can't just hand a contractor a sketch of that one. all the joints will have to be well detailed, not easy with the way it turns the corner.
i like the idea of keeping the existing stair intact as much as possible, but then finding a way to gracefully add the elements (the tile) that the client desires.
(btw has it occurred to anyone else that in this very traditional home to have a prominent stair covered in "moroccan tile" might be just a bit odd? not to say it couldn't be done, but it needs a pretty light touch.)
LB, I thought instantly that Puddles was referring to the Ornamental Ironwork on the star..the figure resembles The little Caesar Guy, see the nose, hair, and spear...maybe I'm way-off...Puddles?
Care to elaborate?

Construction Help: Tile Risers on Existing Stair
I love the construction detail threads, so I'm starting one.
I have a client with an existing stair, built circa 1930. The stair has birch treads and painted risers (and wrought iron rail).
The owner has fallen in love with these beautiful hand painted Moroccan tiles. They want to incorporate them into the stair risers, either as a full riser, which would be expensive in material costs, or as an inset framed by painted wood to create the riser, which is expensive in labor.
Concern #1: we'll end up tearing apart the entire stair to do this. Tile mounted on greenboard mounted on a structural backplate is going to be almost 2" thick, and I'm sure the existing riser is only 3/4".
Concern #2: the riser is a high-abuse location (they get kicked) and the tile will be prone to disengage.
Concern #3: I can spend all day today drawing it, only to have it come in so far over budget it will be canned.
Other concerns?
Or should I just tell them it's not a great idea and find another place to incorporate the beautiful tile?
sounds like you've answered you're own question. Its really up to the client as to wether or not they want to pay for it and put up with the hassle though. So voice your concerns and if they still want to do it then that's their decision.
I've seen slate tile applied directly to the risers with subfloor adhesive, no greenboard, no grout. They've been in place problem-free for I think 4 years now, some friends of mine rent the house and they tend to throw high-abuse parties.....
I'm investigating that application with my contractor right now, FRO. If we don't do grout, cracking isn't as much of an issue.
make a stencil and paint them using the colors from their favorite tiles
i don't think you need greenboard; it's not a wet area. i'd probably use plywood, backer board and tile. yeah, you're going to have to rip out and replace all the treads, but you can retain the existing stringers. if it's what the client wants and is will to pay for the work, why not draw it up and go for it?
Nectar, I can't deal with that subversive material approach!!
Of course, ja, if they want to pay for it anything is possible.
Right now I'm showing it as Option 1. Option 2 is to use the same tile as the backsplash in the Wine Cellar, and I think they'll like that.
what did your contractor think about the idea?
He thinks it's going to be a pain in the ass to install! But thinks the dry-mounting method may work, mounting with adhesive on backer (not green) board. The existing tread-riser joint has a painted dove trim that we could remove so they'd lose a little tread depth but still have some overhang ( a smidge).
you need the moroccan tile risers.
you are not replacing the treads? how deep is the stair nosing, the riser mat'l (3/4"-1"?) and the thickness of your tile? my first solution would be to just lay the tile right over the risers.
is there access underneath the stair to cut the riser material out with a sawzall, mount new riser material behind where the existing riser material meets the stringer, and then fill in where the riser material was with whatever your backer was and let the tile fill in under the nosing? it's going to end up wacked out whatever you do, but as long as you have riser material somewhere under the tread to pick up the bending that occurs when you step on it, your tile should remain in place just fine (i'd be more concerned about the tiles popping out from tread warpage than kicking) that said your riser material will not be sitting on the stringer, but this should be easily accomodated for. it's going to be expensive whether or not you rip out the stair.
the builder will want to rip everything out down to the stringers (which i think can remain), which is probably the preferred method as noted above. i wouldn't spend any time drawing it; the only think the builder really needs to know is the tread and riser depth, which you already have. can't you just give your builder a sketch and have him throw you a price?
nice work bossman, I came back to say more but you covered everything I was thinking...
oh and as for the contractor thinking it's a pain- the slate tile risers I mentioned were installed by the homeowner!! as an afterthought!!!
pffft....
i agree with Apurimac
could you route out a section within each tread and inlay tile sparingly ?
nevermind, my p.m. just confirmed i'm an idiot
actually you could do that, but it would be a major pain because the edge of the router would block the travel of the bit when it hits the nosing and the floor, and you'd have to jig it up.
Thanks bossman!
Contractor says no to laying tile right on the exg. risers, as it won't bond properly with wood ( I should say this contractor is also a good friend and I trust his opinion completely). But he thinks we can attach backer board to the exg. wood and then tile on top of that.
The space under the first run of stairs is accessible, so we could work from behind if need be. The last four risers, (after the landing) unfortunately, are behind a lovely original curved plaster soffit. I don't want to tear that out.
Tread warpage is a good point. These stairs are old, but are in good shape. I wonder what we'll find if we open them up?
And yeah - my drawing is pretty much a sketch elevation, no details - and the contractor will throw a price at it. He's pretty good at it.
plus i don't like router work on any vertical surface. the router is frightening enough of a tool as it is.
1" nosing is a good idea whether it is required by code or not.
huh. i wonder if he can rip out the treads/risers from above without screwing up the soffit uneath. it is probably lathe and plaster and prone to crack with too much banging on the stairs above. if you use the old treads/risers, you probably won't have to worry about warping much; they have settled.
You guys rock.
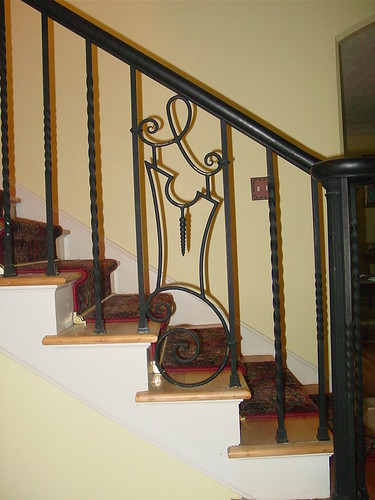
Here is the existing condition:
pizza! pizza!
holy shit, that looks way more difficult than i imagined it. i didn't realize one side of the stair was open. how are you going to detail that edge?
after seeing the stair, i actually like holz.box's idea of cutting a hole for the tile out of the existing riser, then putting backer board behind it and in-setting the tile.
yeah but how do you cut the hole? some trim would take care of the edge
Right, we would do a wood trim piece at the open edge.
holz. your consecutive posts above cracked me up, by the way.
bossman, drill a hole to start it and get sawing.
if the trim is concealing both backer board and tile it's going to get pretty chunky, and how does it work with the existing trim under the tread?
the reason why i like holz's idea is that you're using the riser as the "trim"; it's not a tacked on piece that has to work with the rest of the existing stair.
okay, but if you aren't going to route the hole, than you need to have a something to attach the tile to when you cut the riser area away. since you can't use a router, it will be tough to get a clean cut with a saw
it's a good point and would take a lot of care, but once the hole is cut, you attach backer board behind the riser (from underneath the stair) to have a surface to adhere the tile.
if it's impossible to get a clean cut you may need to have a trim piece around the opening after the tile is layed, but this seems much easier and cleaner than having to trim the edge of the open stair.
well she doesn't wanna douche the curved plaster soffit uneath the stair
totally agree with that. it means you're not going to put the tile in each and every riser (i.e. avoid the risers in front of the plaster soffit). maybe only include it in a few risers. i don't know exactly what the tiles depict, but i think there may be some design in the arrangement of them ascending the stair.
i'm an all or nothing kind of guy.
that's cool. my suggestion is just another possibility.
i love you
they make tiles that have a bullnosed corner for conditions like the above picture
tell them to save their $$$ and buy one of these...

mdler, is that an ice cream dispenser?
One concern with working from the back of the stair is that I imagine there is a center stringer, so we're talking about cutting pieces of backer to fit = 2x the labor.
Is that a stupid assumption? It seems like lots of older houses have a center piece under the stairs treads.
always assume the worst case
Hmmmm - that seems like a polite way of saying "That's a stupid assumption". ;-)
Thanks for all your insight, bossman. This is exactly why I love this kind of thread - there is so much collective knowledge here.
no, it wasn't. i was dead serious. when you prepare for the worst, you become the zen.
lb
it is an ice cream maker
I believe that, although your clients may want tile risers on their stairs, an ice cream maker will bring them more enjoyment that the tile
yay, at least someone thinks the idiot is funny.
ice cream maker would be happy making for me.
that stair is so much nicer (by light years) than anything i have seen in japan that isn't owned by a corporation...it seems a shame to touch it at all.
are you going to redo the outside face (parallel to the stringer)? i imagine the detailing there is going to be kind of difficult if you glue onto backer board and bring the face of the riser outwards. cutting into the face and inlaying the tiles is maybe the nicest looking in spite of the problems listed above.
tile is very common here and we use it a lot. for dry applications like this there are definitely adhesives that can do the job. and it will look beautiful...if the detailing can be worked out on the sides.
and if they set up the ice cream maker on their front porch on a hot day, they can sell ice cream all day long to help pay for the inset-tile stair you'll be drawing for them.
Good point, mightylittle!
Yes, jump, it is a lovely existing stair. The cheek wall (that's what I call the wall parallel to the stringer) isn't being redone, but I think we could incorporate an edge piece that would be painted to match the finish stringer.
Sadly the existing flooring in the stair hall will also all be replaced, even though I like what is there very much. It's Minton tile, or similar, and is in great shape, but it's brown and rust which they aren't crazy about. Maybe if the tile risers come in too expensive I can swing the flooring out of the job to save money elsewhere!
thanks for the lingo, LB.
I learned most of my technical terms as intern in japanese and in english have to rely on building experience as a youth; and that memory is spotty. it is funny when i do dwgs in english i have to look up terms in japanese in my trusty bilingual construction terminology book, and translate them (something unsettling about the need to translate from my 2nd language into my 1st)...
if you do it i am quite curious to see how it will come out. how the edge piece matches the trim under each tread would be interesting. hmm. i suppose if you wanted to be mildly ironic you could make the edge piece out of the same molded trim.
Did anyone else get Puddles' joke? Very funny, and very keen abstract sense.
LB..How are the tiles spaced and would they fill the entire riser? If they are smaller, perhaps they can be traced onto and mortised into the riser board by a craftsman with a sharp chisel and alot of patience. I like the idea of smushing them into the mortise with structural silicone, as it would flex with the stair and hold forever. They would withstand being kicked, too....are these 4"tiles?
Hmmm, interesting to think beyond the limitations of power tools, Nectar!
puddles has been dropping the Little Caesar guy all over the forum today, I'm not sure I get the joke specific to my stair question. He is a funny little guy, though!
i don't think power tools would work anyway. would it?
the carpenters here all do work with hand tools as necessary and don't seem to mind. mind you a typical carpenter in japan is quite ready to make complicated mortice and tenon joints by hand...maybe not the same in the USA?
i can tell that i've been in commercial construction too long now because my first instinct is too forget all the fine detail-y craftsman-y suggestions and have the whole thing removed back to the stringers and make it exactly what you think it needs to be.
most contractors would appreciate that more anyway because it's likely to take them less time if they can start from scratch/rough framing and involve less risk of messing up something adjacent that is 1) intended to stay so they're not getting paid for it and 2) likely to be damaged and replaced by them anyway.
but steven, it seems like such a waste to rip out that beautiful stair. i won't underestimate lb's contractor, but i'm having a hard time believing the new stair will have the same level of craft as the existing (did you notice how the nose of the tread is rolled down? very subtle). i also believe to achieve a high level of craft on the new stair it will have to undergo some thorough detailing; you can't just hand a contractor a sketch of that one. all the joints will have to be well detailed, not easy with the way it turns the corner.
i like the idea of keeping the existing stair intact as much as possible, but then finding a way to gracefully add the elements (the tile) that the client desires.
(btw has it occurred to anyone else that in this very traditional home to have a prominent stair covered in "moroccan tile" might be just a bit odd? not to say it couldn't be done, but it needs a pretty light touch.)
LB, I thought instantly that Puddles was referring to the Ornamental Ironwork on the star..the figure resembles The little Caesar Guy, see the nose, hair, and spear...maybe I'm way-off...Puddles?
Care to elaborate?
Block this user
Are you sure you want to block this user and hide all related comments throughout the site?
Archinect
This is your first comment on Archinect. Your comment will be visible once approved.